
I decided, finally, to move my main hobby project from CVS to Git. I wasn’t new to Git but I hadn’t worked with it for real. So I thought it was a good idea to start doing that and learning the ropes.
Of course there where two parts to that, first migrating the repository, which this blog post will not talk about at all. My only tip is to do that on a genuine Linux system, on Cygwin I ran into a lot of problems.
The second part was to start learning to use Git on a day to day basis. So here’s a very short tutorial on Git for CVS users.
Git structure
Git is a versioning system that have a local repository. The local repository is in a separate directory in your working tree, much like the CVS (or SVN) subdirectory, except Git keeps the whole history there. This means that each working directory has it’s own repository.
Git also makes a difference between changes which are only “added” (Git lingo for “are planned to be committed”, “added to the index”, “added to the staging area” or “staged”) and those that actually have been committed (is in the local repository).
Finally, since Git is a distributed versioning system that allows synchronizing changes between many repositories, there are committed changes which have not yet been sent to other repositories.
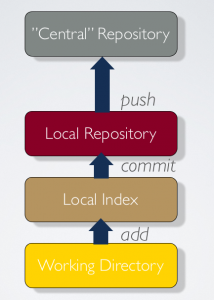
This allows a CVS person to think about Git as a multi-level structure, with a central repository, like to the right.
There you can also see the commands to propagate changes up the structure.
Cloning
The first thing you need to do is to get a copy of a “central” repository (much like the initial CVS checkout cvs -d repository co module). The Git command for this is
git cloneNow you have created a working directory containing a local repository that is a complete copy of the one you cloned. Actually, your local repository has also been connected to the central repository through a Git link which makes it possible to refer to that repository using the name origin.
Working
Once you have a local, cloned, repository, this would be the daily sequence of commands:
git pullPull any changes from the central repository. You can specify origin (which is superflous) or any other repository that your local repository is linked to.
git add
git add -u .
or
git stage
git stage -u .
Add, or stage, any changes to files to the index, or staging area. This includes adding/staging the files themselves if they where not previously under git control. Second version of the command will add all changes in the current directory (you can say another directory instead of ‘.’). Note that if you add a change and then make more changes you need to do another add for Git to pick that. You can easily see what your next step should be using:
git statusIf you want to see the status of your working directory with respect to your local and the central repository git status will give you that. No matter where in the directory structure you are, git will show you the status for the complete tree.
It will show local files that are not under Git control, files that are changed but not added/staged, added/staged but not committed, and also if your repository is in sync with the central repository.
git commitCommit all added/staged changes in the local index to the local repository. There now stored away safely and can be retrieved at any time. If you make multiple commits before syncing with the central repository you get a local history.
There’s a shortcut for adding all modifications of tracked files at the same time as you commit them:
git commit -aNow all local changes are safe in your local repository. So its time to
git pushUse this command to push all changes in your local repository to the central repository (origin). Git might force you to do a git pull first. All commits that you have made since the last pull will be pushed as a single delta.
What I really like about Git is
- speed
- it always considers your whole structure, you will never again think about versions of individual files
- local commits create local history that you can manage locally, branching, merging and what not, until you are certain about what you want to push
All in all Git gives more local control and options, if and when you need it. If you don’t you can work with the commands above to make your transition from CVS, or SVN, very easy.
Lars Vogel has written a much longer tutorial, and Google is of course there to help too.